‘Enchanting Rupert’ and ‘It Happened One Day’ at the Viewster Online Film Festival

Hello everybody!

Good news to spread – two short movies, for which my company futuresonic did the audio post production work, are now showing at the Viewster Online Film Festival. For a limited time you can watch, comment, rate, like and share the movies using the Viewster platform. Both are romantic comedies, so if you are feeling romantic these are a good watch – just click on the posters and you’ll get right to the movies!
I posted more stills on the futuresonic blog – have a look at them here.
Every vote counts, so if you like the movies please share your opinion on the Viewster platform.
Thanks for watching!
Viewster Online Film Festival VOFF Logos voff2blog
Enchanting Rupert - Viewster Online Film Festival ER_Poster
It Happened One Day - Viewster Online Film Festival IHOD_Poster

The Dead Eyes of Dust again…

Here’s an update from our experimental electro-rock project! ‘Imagine the Unreal’ has an eerie feeling to it, mainly due to the diminished harmonies and distorted vocals. As always feedback is highly welcome – enjoy!

Credits:
Kai Thorben Bunzel: Programming / vocals
Andrey Fillies: Guitar
Norbert Weiher: Guitar / Bass / Vocals / Programming

Music: The Dead Eyes of Dust
Lyrics: Norbert Weiher / Kai Thorben Bunzel

The Science of Sample Rates

Here’s a great article I found about the science of sample rates. Enjoy the read…

Remember to have a nice day 🙂

Two iOS apps for musicians / guitarists worth having

Recently I stumbled over two apps for iOS that I feel are definitively worth sharing here – Guitar Toolkit and Mapping Tonal Harmony Pro. The former – the name says it all – is useful mainly for guitarists, but I found that some of its functionalities is useful for keyboard players too. The latter is an app made for studying harmony, but for me it has become mainly a great composition tool. Let’s have a look at them.

Guitar Toolkit (Agile Partners)

GuitarToolkit

This app works on iPad / iPhone and iPod, even though I prefer the larger screen of the iPad to work with. The basic version costs $9.99, but there is an upgrade available to Guitar Toolkit Guitar Toolkit + for another $4.99 which is well worth the money.

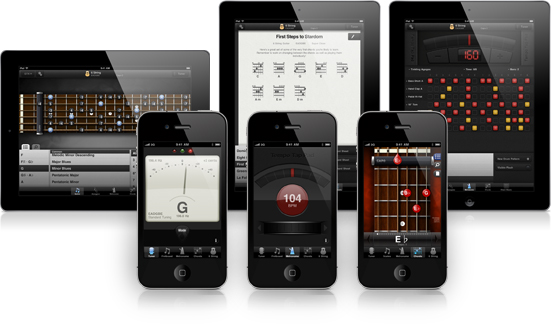
The basic app gives you access to a library of scales, arpeggios and chords, each available in a separate tab. It also has a metronome (more like a tiny drum machine) and a tuner. According to Agile Partners’ website the software knows about 2.000.000 chords, 900 scales and 70 arpeggios (in various playing positions). This app has made my collection of scale / chord books (which are tedious to browse if you need a quick access to a chord voicing or a scale in a composing session) completely obsolete.

It gets better – each of the three functions (scales, chords, arpeggios) has a search function. Just tap the notes you play and it suggests you which scale / chord / arp you are dealing with. You can even select a chord and let Guitar Toolkit suggest which scales will fit – fantastic. Together with the tuner and metronome it’s become my favourite guitar jamming / composing / practising app.

The basic version takes you already a long way, but if you invest in the Guitar Toolkit+ upgrade you gain access to three other functions that are well worth the money: chord sheets, an advanced metronome and custom instruments.

The advanced metronome turns the basic (non-editable) metronome into a full drum machine. Lots of drum sounds, up to 32 instrument tracks and 16 bars to program makes this the ideal companion if you’re on the go and need a bit more than just a ‘four to the floor’ metronome.

The custom instruments function lets you specify how Guitar Toolkit sounds when you touch a string or strum a chord. In the basic version you can choose from various presets, but with the upgrade you can customize your guitar (or bass, banjo, mandolin, …) type as well as the amplifier. This works great in conjunction with the last function that is unlocked with this upgrade, the chord sheets.

These give you the option to generate chord sheets quickly and easily, add comments to them, share them via email (as native app format or PDF) or print them directly through the iPad. If you open a chord sheet on the iPad and touch a specific chord it will strum it. Tap and hold does an arpeggio (this works great in conjunction with the custom instruments!).

This last function is saving me a lot of time and I feel that during playing I can focus on the composition side rather than the inevitable ‘I-need-to-write-this-down-else-I-forget’ part.

Mapping Tonal Harmony Pro

screen480x480This app looks daunting at first, but I urge anyone who needs to work with harmony – be this a composer, student, instrumentalist – to have a look at this app and check out it’s functions. It’s made by mDecks Music for $6.99, and on their site is a great selection of tutorial videos explaining every function of the software.

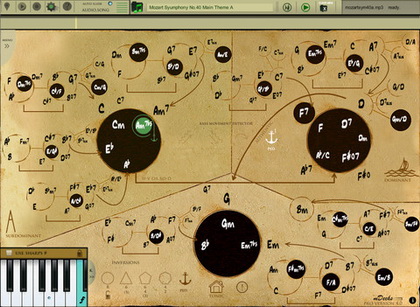
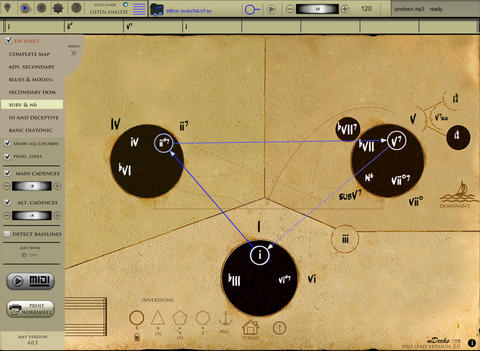
As the name suggests it is a map of tonal harmonies – in the screenshot above you see it working in ‘functional’ mode (giving you the roman numerals, e.g. I, IV, V which delineate the harmonic function instead of proper root notes for a given key, e.g. C, F, G in the key of C).

The map has various ‘levels’ of complexity which can be chosen from a pop-up menu on the side (shown in the screenshot, on the left). The higher we go (from ‘basic diatonic’ to ‘complete map’) the more complex the picture gets. In this menu you can also choose to display or hide the main and alternative cadences (e.g. your classic V-I, or G-C).

Ok, so far this app shows me the relationship between chords, either in a functional way or in a defined key. How does this help me as a composer? Let’s have a look at the different program modes:

The basic mode is the ‘study mode’ in which we can look at the map and explore each chord by tapping it. The key in which I am working can be changed through a keyboard pop-up on the bottom (here, I can also choose to work with the ‘functional’ display). This is already a quick way to listen and explore chord progressions. If you don’t have an instrument at hand and need to know how a V7-i progression sounds – just tap the chords and the app harmonises the cadence nicely for you. You have the choice between ‘classical’ and ‘jazz’ mode (the latter essentially adding a bit of color to the chords using your 9/11/13 alterations instead of the more ‘pure’ classical chords.

The next mode is ‘listen / analyze’. Here, I can select a cadence from a list (which starts with the basic I-V7-I all the way through blues progressions up to secondary dominants and jazz progressions), display it in the map and play it. This is fantastic for people starting to study harmony, but also serves as a great repertoire of cadences for a composer.

Next up is ‘record / create’ – in this mode we can record progressions by double-tapping on the chords. The generated sequences can be exported as MIDI or printed. This function has become my every day companion which I use in conjunction with Guitar Toolkit to quickly create progressions for a given melody line. In the old days I always needed to write things down (which, as you may guess, I am not very good at) – now this app gives me a much more ‘musical’ approach to composing.

Last but not least we have an ‘audio song’ mode. In this mode you can select from a couple of audio snippets (a lot of Mozart and Beethoven here, but also the blues), play the snippet and have the software show you the harmonies that are used.

The author uses material from the public domain and the available list (as well as the map) is continuously updated.

MappingTonalHarmonyPro4_resize


The image above shows a more complex map. Even though this might look a bit mind-boggling at first I strongly recommend delving into the functions of this app. Once you figured out how it works (it is quite straightforward) it will help you immensely with your studies or compositions.

That’s it for today – my 5 cents of iOS apps worth sharing. Hope you liked it – make sure to leave a comment!

Remember to have a nice day.

More from The Dead Eyes of Dust…

Hello everyone!

Here is a cover song that we made for a radio competition in Curitiba – ‘Crie, Recrie, Invente’ from Rádio Mundo Livre. We got some nice airplay for this, so I thought it’s worth sharing with you here on WordPress too.

Enjoy – and let us know what you think!

And most importantly – remember to have a nice day!

First song of 2014 – ‘Deliverance’ from ‘The Dead Eyes of Dust’

Hello everyone!

I thought it’s time to start posting some of my own songs by now. Here is one from a project called ‘The Dead Eyes of Dust’ – a collaboration of 2 brazilian and 2 german musicians / engineers. It’s called ‘Deliverance’ – hope you enjoy it!

Lineup

Veronica Tomaz Costa – vocals

Andrey Fillies – guitars

Kai Thorben Bunzel – synth and drum programming

Norbert Weiher – bass, guitars, programming and engineering

I wish you all a happy 2014.

Updated page

While I’m here I thought I’d do some housekeeping… there’s new stuff to see on the showreel, music, CV and credits pages. Feel free to browse. Thanks for stopping by.

The most tedious change: A version in Portuguese – just click the brazilian flag!

Punkake – ‘Meow’

It’s been some time since I’ve posted something – but here’s a great video from Curitiba-based all-girl band ‘Punkake’ for which I had the pleasure of being the recording engineer. Enjoy!

Credits (Audio)

Produced by Ruth Varella
Recorded at Click Audioworks by Norbert Weiher
Mixed by Stephen George at Gimme That Sound
Mastered by Chris Gehringer at Sterling Sound

Credits (Video)

Directed by Paulo Biscaia Filho
Recorded, produced and edited by Vigor Mortis
Executive Production by Klaus Magno
Esthetic Production by Thamis Le Senechal (PinUp! Hair + Style)
Hair by Rodolfo Di Avansi
Make up by Inayara Fonseca
Hair assistants: Paulo Edu Freitas & Vanessa Casagrande

A (hopefully) simple stab at the difference between floating- and fixed point numbers

Since Pro Tools 10 has introduced the 32-bit floating point file format I thought it would be a good time to give a (hopefully simple) explanation on why the 32-bit floating point format yields a so much larger dynamic range than the conventional 24- or 16-bit fixed-point formats.

Note: The text below is illustrative and does not deal with the implementation of floating-point arithmetic in DAWs.

Fixed- and floating point systems are two different ways to use digits and encode them into a value. Let’s have a look:

Fixed-point numbers

In the decimal system a sequence of digits like ‘123’ is usually interpreted like this:

value = a*10^0 + b*10^1 + c*10 ^2 + …

for example:

123 = 1*10^2 (100) + 2*10^1 (20) + 3*10^0 (3)

If I introduce a decimal point all digits to the right of it will be multiplied with negative exponents:

1.23 = 1*10^0 (1) + 2*10^-1 (0.2) + 3*10^-2 (0.03)

Assume now that I have 5 digits (in the binary system these would be your bits) to represent a number, using the above system. Fixed-point means that I have to choose where my decimal point is going to be. So I can either represent small numbers with high accuracy (e.g. 1.1234, 9.4324) or large numbers with low accuracy after the decimal point (1000.2, 9500.9).

In fixed point arithmetic choosing the position of your decimal point will set the upper and lower limit of the value you can represent with your digits – your dynamic range. The resolution behind the decimal point will be the same for all encoded values.

Floating point numbers

Instead of the representation used above I will now use a different way to encode digits into values:

value = significand * 10^exponent

Here, the significand is a sequence of digits with an implied decimal point after the first one. I need to choose how many of my 5 digits I will use to describe the significand and the exponent.

Let’s imagine that I use 4 digits for the former and 1 for the latter. This means that, using the same 5 digits that I have used before, I can now encode values from (excluding 0)

0.001 * 10^0 = 0.001

to

9.999 * 10^9 = 9999000000

This range of values is not accessible using fixed-point (where, if I chose to have no digit after the decimal point, I could encode values from 0 to 99999).

Summing up, floating-point arithmetic uses a different way of interpreting your digits (or your bits in your computer) than fixed-point, giving you the possibility to encode a larger range of values (or dynamic range in your audio file).

As said in the beginning this text is meant to explain the basic idea in the decimal system – the principle is the same in the binary one.

Signing off,

Norbert

Removing excessive natural reverberation in audio post

One problem that you may encounter in audio post work is a large amount of natural reverberation recorded on the sync tracks. In the worst case this will make your dialogue difficult to understand as well as give you problems to match other (more closely mic’ed) dialogue to it.

In this post I want to share two approaches to diminish this natural reverberation on the track leaving you with cleaner audio to work with.

Solution 1: Expanding

You’ll need a downward expansion plug-in (ie a gate that has a ratio setting) such as Avid’s Expander Gate Dynamics III. Use a low ratio (1.1 – 1.4), fast attack and set the threshold to 0 dB. Leave hold and release relatively short. You will notice that the reverb tails at the end of words drop significantly. Of course this does not remove early reflections, but at least it kills annoyingly long decay times, leaving you with more intelligible dialogue. The higher the ratio, the more intense the effect.

Removing reverb tails on sync sound using a gate

Solution 2: Using phase-inversion, EQ and compression

This is slightly more complicated but gives you more freedom with regards to which frequencies you want to affect. In the screenshot below, I have duplicated my problematic track and processed the audio on the duplicate using an equaliser with just the phase-inverter switched on. Playing back both tracks you should hear – nothing (if you still do, check that all automation on both tracks is the exactly the same).

Original and phase-inverted track

Now, add a compressor to the phase-inverted track, use settings like these (important: fast attack, low threshold, low ratio):

Compressor setup

If you need a more agressive effect try to raise the compression ratio (you will first notice that the sound becomes more and more similar to the original since you are adding less and less of the phase inverted signal) and then raise the output gain of the compressor until you are satisfied with the result. Here’s an example:

More extreme compression settings

Last but not least: If you want to tweak the frequency response of your effect, insert an equaliser before the compressor. Experiment with low- and high shelves for a start and see how they affect the sound. Interestingly, if you shelve off the highs of the phase-inverted track the low and mid-frequencies become more accentuated and vice versa.

Finally, here’s a screenshot showing the original audio on top and the three approaches discussed (simple gating, phase-invert and compress with low ratio and phase-invert and compress with high ratio) below.

Reducing reverb tails - results

That’s it for now – I hope you liked the read. If you’ve got any feedback or want to discuss results, feel free to leave a comment!

Signing off…

Norbert